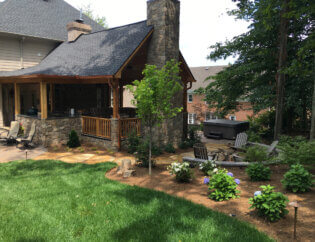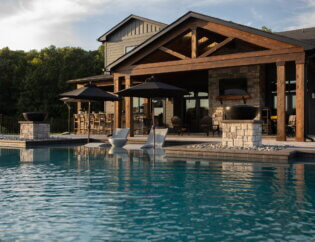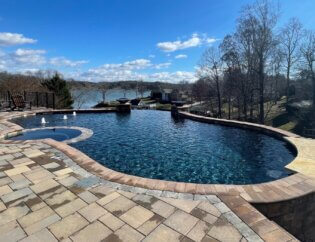


It’s officially summer and everyone is finally ready for some warm and dry weather, spending time on your outdoor living space, enjoying your paver patio or outdoor kitchen you just had put in so you can grill for the family or get some R&R in your backyard.
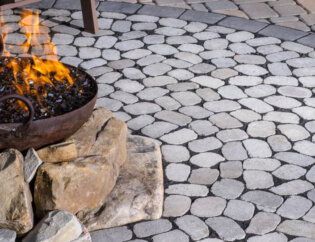
Maybe you’re ready to gather some people around the new Belgard Fire Pit and love feeling the heat even in the summer or just enjoying the ambiance in the background. You come outside after months and months of wet, rainy weather and it’s just not looking its best.
Let’s be honest, some patios haven’t looked their best in 4 or 5 years, and plenty of folks aren’t even sure where to start when it comes to getting them back in shape. Or maybe you just bought a new home and want to keep the backyard looking sharp, without the cost of adding on or starting from scratch. It might be because your outdoor living company who installed everything told you, “Oh, there’s no maintenance on a paver patio!” Or maybe life just got busy, and routine maintenance slipped through the cracks.
Then you jumped on Google to search for a way to clean your pavers or seal your pavers and found this blog post (hopefully!). I can’t tell you how many old projects I have gone back to, paver patios or paver pool decks, that are showing signs of aggregate coming through the surface of the paver due to sun damage, or have black, moldy polymeric sand.
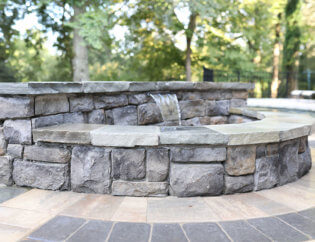
All of this could be avoided with simple yearly maintenance and sealing your pavers from the start to protect your investment. After years of training and successfully bringing paver patios, paver pool decks, stone patios, and stone pool decks back to life, we’ve broken our process into a few simple steps and visits. We also have application-specific solutions at our disposal, so each project can be different. We’ll find the right process for your specific outdoor living space.
Visit #1: Restore and Prepare Your Pavers
Paver Patio and Paver Pool Deck Joint Sand Removal
If your project is a restoration project, first our team will come in and start prepping the area by taping off spaces we do not want to disturb. We’ll also cover areas with plastic because things are about to get messy!
We’ll remove the old polymeric sand, which is probably black and moldy from years of moisture, buildup, and just plain neglect.
We typically remove it down approximately 1” into the joints. Unless your project includes a driveway, we do not remove all of the old joint sand so as not to disturb the existing base material. After we’ve spent hours and hours removing the joint sand, we’ll start doing our repairs.
Paver Patio Repairs
Based on the proposal we’ve written, which includes all of the work we’ll complete, this is where we’ll start to fix those low “toe-kicker pavers,” settled edges, or general areas that have shifted over time. If you have a failing paver-edge restraint and we’ve specified in your proposal that it needs to be replaced, we’ll go ahead and take care of that.
Now we can move on to cleaning the pavers.
Paver Cleaning
Some of our clients’ projects may start in this phase if we’re coming in after another paver installer to seal your pavers. Once the repairs are completed, we move into the cleaning phase, and this generally all happens in the same first visit.
We’ll deep clean your pavers with the appropriate cleaning solutions we’ve tested over years of trial and error. This step gets your pavers looking fresh, honestly, probably better than they’ve looked in years.
Once they’re clean and free of any efflorescence or stains, we move on to either paver joint sand or sealing.

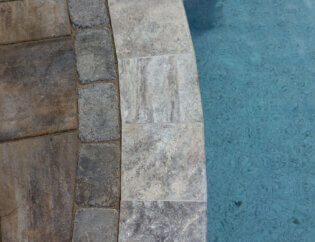
Paver Jointing (Re-sanding)
In the hardscape and outdoor living world, there are lots of new products on the market that might be a great solution for your paver or stone patio. We have a couple of methods we use to get your joints re-sanded, and whether we use a wet or dry method depends on your project and the weather at the time.
For paver restoration, we typically use SEK Surebond Paver Joint Sand for most paver, stone, or travertine projects. This also depends on the sealer chosen and how it stabilizes (aka locks up) your joints and makes them hard.
On most of our paver patio and stone patio installations, we use SEK Surebond Extreme WideJoint Sand because it has a bit more polymer in it, for only a small increase in cost.
The new resin sands that have hit the market are fantastic products. Yes, they can be more expensive and take longer to install, but they tend to last considerably longer.
In the early days, resin sands could only be used on wider jointed pavers and stone, but now they’ve released resin joint sands that can be installed in smaller joints too. They take longer to install and can raise the project cost a bit, but they’re worth it if it fits in with your budget.
Regardless of what product gets used on your project, making sure the proper level of joint fill material is installed and not over or under filled. This means your project might look different than the initial installation if your joints were over filled or under filled. Take a peek at the diagram for proper joint sand levels for your specific paver.

Visit #2: Sealing for Long-Term Protection
Now that we’ve gotten your paver patio back in shape, or cleaned it up after all the construction, we’re ready to lay down the sealer.
We can control the look of the sealer, starting with no visible signs of it at all. That’s called a “Natural Look” Stone or Paver Sealer (or “Clear Paver Sealer”). Then there’s the Color-Enhancing Paver Sealer, a satin or matte finish that looks like it rained about an hour ago and has just dried (think SEK SB-8700 or SB-6750). Finally, there are Wet Look Sealers, which are high-gloss and give the look of fresh puddles, like SEK SB-6400 or SB-6700.
We apply the sealer on a separate visit to allow time for the pavers to dry—not just on the surface but below the surface too. We’ll apply a flood coat, meaning it’s over-applied and then spread and directed into the joints to saturate and lock them up.
Some of the sealers mentioned require two coats, and we’ll specify that in your proposal if so.
Tips to Keep Everything Looking Fresh
- Keep leaf debris off your pavers whenever possible. Use a battery-powered blower weekly, especially in heavy debris seasons like spring and fall.
• Clean up spills as soon as possible. It should be much easier now that most messes stay on top of the sealed surface.
• Adjust sprinklers or irrigation to reduce overspray on your pavers whenever you can.
• Planters should be up on stands, casters, or pot feet at a minimum. Hose off underneath weekly to prevent buildup.
• Get on a routine maintenance plan with us! We generally recommend a 3-year cycle:
- Year 1: Clean & Seal
- Year 2: Clean & Spot Treat
- Year 3: Reseal

Why Choose Avant Gardens and Hardscapes?
We’ve helped homeowners across Knoxville, Farragut, Maryville, Lenoir City, Sevierville and Gatlinburg protect their patios, pool decks, and stone hardscapes. Our tested processes, top-tier materials, and skilled technicians ensure your outdoor space stays beautiful for years.
Ready to Restore Your Patio?
Call us today at 865-235-1785 or schedule a consultation today.